Sunday, May 28, 2017

TROPICAL SUN


In this tutorial I used


Used the beautiful kit from Yude’s Kreationz - PTU kit called Tropical Sun - You can purchase the kit here – 


 I used Very Many tube- you can purchase her tubes here - You need a license to use her tubes  - 


I used PSP 9 but any version should work

Font I used – Salient

Mask – Of your choice

Drop Shadow I used – 0 2 25 8

Open a new transparent canvas 700 by 600 and fill with white

Add your drop shadow as you go along 


Paper 4 - Add mask - Delete mask - Merge Group

Place in tube – resize if needed

Element 25 - resize to 25 - Place in position 

Element 20 - resize to 27 - Place in position

Element 26 - resize to 20 - Place in position 

Element 27 - resize to 55 -  Place in position 

Element 17 - resize to 23 - Mirror - Place in position

Element 41 - resize to one to 60 – one to 40 - Place in position – Merge down

Element 69 - resize to 15 - Place in position

Element 68 - resize to 22 - Place in position

Element 1 - resize to 50 - Place in position

Element 35 - resize to 12 - Place in position

Element 14 – resize to 15 – Place in position

Element 47 – resize to 30 – Duplicate – Place in position – Merge down

Element 12 – resize to 20 – Place in position

Element 8 – resize to 17 – Place in position

Element 21 – resize to 17 – Place in position

Element 58 – resize to 50 – Place in position


Add any other elements you would like

Merge Visable

Resize your tag 

Add Copyright information

Add name

Thank you for trying my tutorial

SUMMER BLISS


In this tutorial I used


Used the beautiful kit from Yude’s Kreationz - PTU kit called Summer Bliss - You can purchase the kit here – 

http://renderartworld.com/shop/index.php?main_page=product_info&cPath=1_414&products_id=13743

 I used Alex Prihodko tube - you can purchase his tubes here - You need a license to use his tubes  - 


I used PSP 9 but any version should work

Font I used – S’orieno

Mask – Of your choice

Drop Shadow I used – 0 2 25 8

Open a new transparent canvas 700 by 600 and fill with white

Add your drop shadow as you go along 


Paper 2 - Add mask - Delete mask - Merge Group

Element 42 - resize to 25 - Mirror - Place in position 

Element 34 - resize to 80 - Place in position

Element 54 - resize to 50 - Place in position 

Element 51 - resize to 18 -  Place in position 

Element 40 - resize to 15 – Place on the left – Duplicate – Place in the middle – Merge down – Duplicate – Mirror - Place in position – Merge down

Element 50 - resize to 55- Duplicate – Erase around so it blends in – See mine as reference - Place in position – Merge down

Element 49 - resize to 15 – Duplicate – Merge down – Duplicate – Mirror – Merge down - Place in position

Element 1 - resize to 12 - Place in position

Element 23 - resize to 15 - Place in position

Element 47 - resize to 15 - Place in position

Element 46 – resize to 20 – Place in position

Element 53 – resize to 12 – Place in position

Element 35 – resize to 20 – Place in positon

Element 44 – resize to 20 – Place in position

Element 20 – resize to 8 – Place in position

Add any other elements you would like

Merge Visable

Resize your tag 

Add Copyright information

Add name

Thank you for trying my tutorial


Saturday, May 27, 2017

PINUP IN GARDEN 1


In this tutorial I used


Used the beautiful kit from Lil Mz’s Brainstorm - PTU kit called PinUp In Garden 1 - You can purchase the kit here – 


 I used Lysisange tube- you can purchase her tubes here - You need a license to use her tubes  - 


I used PSP 9 but any version should work

Font I used – Honey Script

Mask – Of your choice

Plug-Ins Used – Xero – Porcelain – 50 128 128 0 0 0 – On tube only

Drop Shadow I used – 0 2 25 8

Open a new transparent canvas 700 by 600 and fill with white

Add your drop shadow as you go along 


Paper 14 - Add mask - Delete mask - Merge Group

Tube – If using the same as me – I resize mine to 40

Element 1 - resize to 50 - Place in position 

Element 73 - resize to 40 - Place in position

Element 29 - resize to 40 - Place in position 

Element 101 - resize to 40 - Place in position 

Element 64 - resize to 15 – Duplicate – Mirror - Place in position

Element 13 - resize to 35 - Place in position 

Element 12 - resize to 35 - Place in position

Element 14 - resize to 20 - Place in position

Element 20 - resize to 40 – Duplicate – Merge down - Duplicate - Place in position

Element 33 - resize to 40 - Place in position

Element 8 – resize to 7 – Place in position

Element 81 – resize to 35 – Place in position

Element 3 – resize to 12 – Place in position

Element 82 – resize to 50 – Place in position

Element 92 – resize to 15 – Place in position

Add any other elements you would like

Merge Visable

Resize your tag 

Add Copyright information

Add name

Thank you for trying my tutorial


THE SWEETEST SPRING


In this tutorial I used


Used the beautiful kit from Yude’s Kreationz - PTU kit called The Sweetest Spring - You can purchase the kit here – 

http://renderartworld.com/shop/index.php?main_page=product_info&cPath=1_414&products_id=13735

 I used Very Many tube- you can purchase her tubes here - You need a license to use her tubes  -  

I used PSP 9 but any version should work

Font I used – S’orieno

Mask – Of your choice

Drop Shadow I used – 0 2 25 8

Open a new transparent canvas 700 by 600 and fill with white

Add your drop shadow as you go along 


Paper 1 - Add mask - Delete mask - Merge Group

Tube – If using the same one as me – I resize mine to 40 - Place in position 

Element 4 - resize to 68 - Place in position

Paper 2 – Place under Element 4 - Expand by 5 - Place in position 

Element 33 - resize to 40 -  Place in position 

Element 42 - resize to 50 - Place in position

Element 39 - resize to 25 - Place in position 

Element 27 - resize to 20 - Place in position

Element 40 - resize to 35 - Place in position

Element 13 - resize to 35 - Place in position

Element 41 - resize to 35 - Place in position

Element 51 – resize to 25 – Place in position

Element 34 – resize to 35 – Place in position

Element 6 – resize to 20 – Place in position


Add any other elements you would like

Merge Visable

Resize your tag 

Add Copyright information

Add name


Friday, May 26, 2017

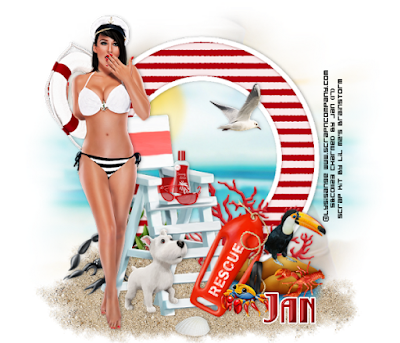
SEXY LIFEGUARD


In this tutorial I used


Used the beautiful kit from Lil Mz’s Brainstorm - PTU kit called Sexy Lifeguard - You can purchase the kit here – 

http://scrapsncompany.com/index.php?main_page=product_info&cPath=112_591_593&products_id=29155

 I used Lysisange - you can purchase her tubes here - You need a license to use her tubes  - 

http://scrapsncompany.com/index.php?main_page=product_info&cPath=113_562&products_id=29161

I used PSP 9 but any version should work

Font I used – Betty Noir

Mask – Of your choice

Drop Shadow I used – 0 2 25 8

Open a new transparent canvas 700 by 600 and fill with white

Add your drop shadow as you go along 


Paper 16 - Add mask - Delete mask - Merge Group

Tube – If using the same as me – I resize mine to 43 – Place in position

Element 46 - resize to 70 - Place in position 

Paper 16 – Place under Element 46 – Expand 10

Element 16 – Mirror – resize to 60 – Place in position

Element 45 - resize to 35 - Place in position

Element 11 - resize to 25 - Place in position 

Element 44 - resize to 40 - Place in position 

Element 83 - resize to 35 - Place in position

Element 6 - resize to 15 - Place in position 

Element 35 - resize to 15 - Place in position

Element 37 - resize to 12 - Place in position

Element 91 - resize to 25 - Place in position

Element 90 - resize to 40 - Place in position

Element 10 – resize to 60 – Duplicate – Place in position – Merge down – Duplicate 3 more times – Place in position – See mine as a reference – Merge down

Element 72 – resize to 25 – Place in position

Element 26 – resize to 15 – Place in position

Element 30 – resize to 16 – Place in position

Element 19 – resize to 50 – Place in position

Add any other elements you would like

Merge Visable

Resize your tag 

Add Copyright information

Add name

Thank you for trying my tutorial


ISLAND DREAMZ


***CT for All Dolled Up!***

ஐ¯¨'*·~-.¸¸,.-~*' Island Dreamz¯¨'*·~-.¸¸,.-~*'ஐ
Do you have those dreamz of being on the islands? Well this kit will take you there and make you feel right at home with 140 bright elements and 20 vibrant papers. Not all elements are shown in preview. For Personal Use only.

All Dolled Up!:
https://goo.gl/6Pr3XJ

PicsForDesign:
https://goo.gl/VEE3wQ


Thursday, May 25, 2017

BEACH BEARS


***CT for Designz by Sue***

Super cute kit with lots of cool elements – Comes with 85 elements and 15 papers -- PTU Kit called “Beach Bears”

You can purchase the kit here:

SNCO... http://scrapsncompany.com/index.php…

PFD... http://picsfordesign.com/
…/catal…/sort/date/auth/sue5473.pix

SMILEY... http://smileycreations.co.uk/index.php…

DDR... http://digitaldesignerresources.com/shop/index.php…

INSPIRED... http://www.inspirationsofscrapsfriends.com/shop/index.php…

DGD... http://digigraphicdesigns.com/index.php…

DESIGNER SCRAPS... http://designerscraps.com/index.php…